

Key Takeaways
- Everything happens on the hoodie's product page: pick a side, pick printing, embroidery, or a patch, pick a spot, then build in the Design Studio.
- Each side is its own design with its own per-piece price; a front print and a back print are two.
- Free to use, no minimum, and a proof to approve before production.
Table of Contents
- Start on the Hoodie's Product Page
- Pick a Side, a Method, and a Spot
- Design Your Own Hoodie on a Live Preview
- Name It, Set Sizes, and Watch the Price
- Add to Cart, Approve the Proof, and Get It Made
- Frequently Asked Questions
- Start Your Hoodie Design
By the end of this walkthrough, your design is on the hoodie's own product photo, with a live price for the sizes you picked. You can design your own hoodie online at Griwolfe with no design software and no minimum. The work happens in the free Design Studio, on a live preview of the garment itself. We ran every step below on a real hoodie and captured each screen along the way. The path runs from the product page to the cart, then to the proof we email before production.
Start on the Hoodie's Product Page
There's no separate design app to hunt for. Every Griwolfe hoodie's product page carries a design panel, and that panel is where your design starts.
- Open the product page of the hoodie you want, and pick its color. We'll use the Gildan Heavy Blend Hoodie in navy for this walkthrough; the flow is the same on every garment. The preview shows your design on the exact color you choose.

- Look over the design panel. It lists the sides you can decorate (front, back, left, and right) and how many spots each offers. This hoodie lists fifteen spots in all. Printing, embroidery, and patches are all available. Clicking a side flips the product photo to that angle so you can see the space you're choosing.

- Click Start designing. The Design Studio opens full screen and asks where your design goes. Each side of the garment is a placement, and each one shows the spots it offers. Start anywhere, and add more sides later if you want them.

Still comparing garments? Browse custom hoodies and open any product page to see its sides and pricing before you commit to anything.
Pick a Side, a Method, and a Spot
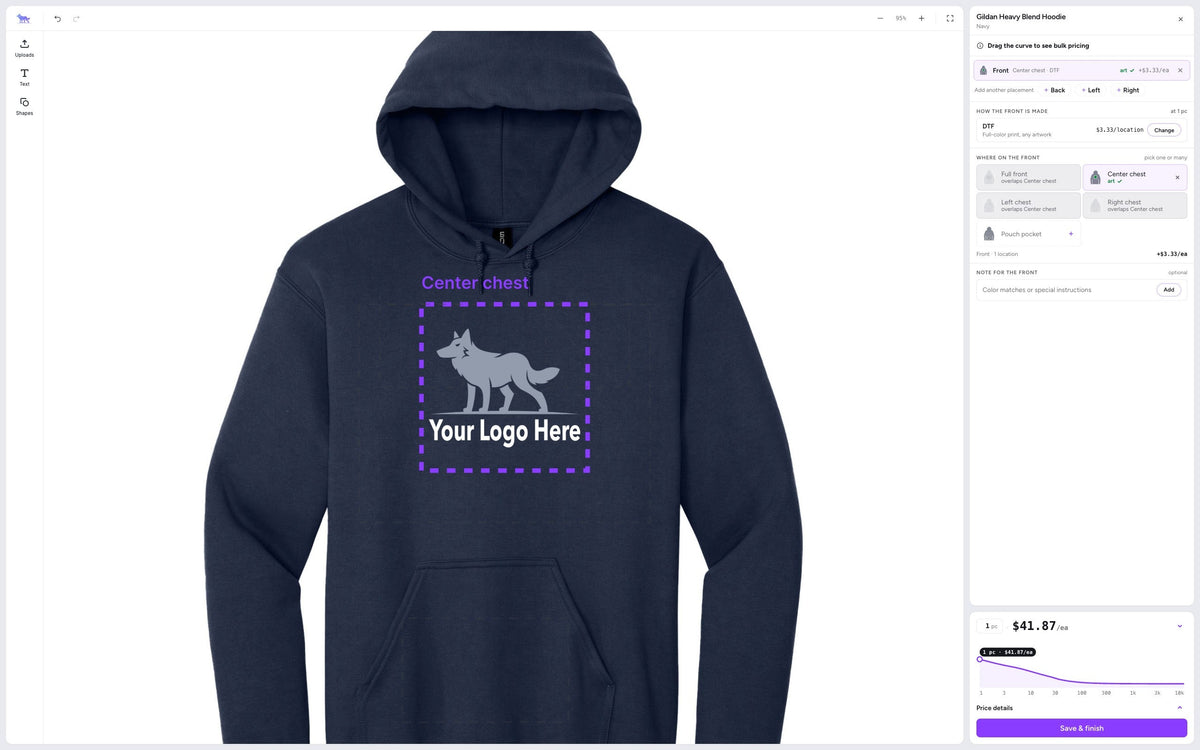
- Pick the side, then pick how it's made. Choose Front, and the panel asks how the front is made: select Print for printed designs; it's the default. Embroidery and patch sit on the same list, each described in plain terms, and a patch is a separate piece we hand-stitch on. The method is set per side, so the front can be printed while the back takes embroidery.

- Pick where on the front. The front of this hoodie offers five spots: full front, center chest, left chest, right chest, and the pouch pocket. Pick one or many; spots that overlap each other can't be combined, and the panel grays out the conflicts as you choose. We picked center chest.

How big can the design be? Each spot has a maximum design size, printing covers the largest areas, and embroidery and patches run smaller. Treat those as "up to" numbers, because a specific hoodie's own limit can be smaller. The design proof confirms the exact size before production. For spot-by-spot sizes in inches, and which spot suits which kind of logo, see our hoodie vs sweatshirt guide.
Note: every side also has its own note field for color matches or special instructions. Anything specific you want handled (an exact width, a thread color, a placement tweak) goes there in plain words. The field's own example is a Pantone color match. Our design team reads it and makes it happen, and you'll see the result on the proof before production.
Design Your Own Hoodie on a Live Preview
- Add your artwork. Click Upload art on the spot you picked and add a PNG or JPEG. Then click your file in the panel to place it on the hoodie. A logo and a photo upload the same way; any picture saved as PNG or JPEG works. Have an AI or SVG file instead? Email it to custom@griwolfe.com and we'll bring it in; more formats are in development. Our guide to uploading and prepping your logo covers file quality, background removal, and color matching in depth.

- Remove the background in one click. Our sample logo arrived on a white background, so the BG Removal button took it off in one click. That left the logo's black lettering nearly invisible on the navy fleece.

- Recolor the artwork to suit the garment. The Design Studio detects each color in your file and gives it its own swatch. Our logo carried two: the gray wolf and the black lettering. We swapped only the lettering to white from the named color list, and the wolf stayed untouched. You can also build from scratch here: plain text, curved text in arch, circle, or wave shapes, ready-made text styles, and a full font library.


- Add a note if anything needs exact handling, then click Save & finish. We asked for the logo to sit two inches below the collar. If you get stuck at any point, ask on live chat and the design team helps right away. Between the live chat and the note field, anything you can describe can be built.

Name It, Set Sizes, and Watch the Price
- Back on the product page, your design is on the product photos. The saved design shows up on the hoodie's own photos, and a Your design card lists each side with its method and spot. Adding the back or a sleeve later is one click from the same card. Name the design if you like; the field is optional. A name like "Fall crew hoodies" helps when an order carries more than one design.

- Set a quantity for each size you need. The size grid lists every size this hoodie comes in, XS through 5XL on the Heavy Blend. Extended sizes carry a small per-piece upcharge, shown right in the grid. The total updates as you type, and the per-piece price drops as the quantity grows. A live curve shows the price at any quantity, so you can weigh one hoodie against a batch before committing.

Add to Cart, Approve the Proof, and Get It Made
- Add the hoodie to your cart. Your order lands in the cart under the design's name. Every product and color you add to the same design counts together, so per-piece pricing keeps dropping as the group grows. The cart even shows how close you are to the next price break. Everything you chose carries through: the cart line lists each side's method, spot, sizes, and even the note you wrote. There's no artwork fee and no setup fee at checkout; the price reflects the product, the method, and the quantity.

- Approve your proof. Within 1 to 2 business days of ordering, we email a production-ready design proof. Reply with changes as many times as you like; revisions are unlimited and free, and nothing is produced until you approve. Standard production is 2 weeks for embroidery and printing, and 4 weeks for patch methods. If your deadline is tighter, rush service runs as low as 3 business days. Contact us by phone, email, or live chat and we'll work with your timeline.
Frequently Asked Questions
Can I design my own hoodie online without design experience?
Yes. The Design Studio is free, opens from the hoodie's product page, and needs no design software. Upload a logo or build with text and shapes, and the live preview shows the design on the garment as you work. You pay only when you place an order.
Do the front and back of a hoodie count as one design or two?
Two. Each side carries its own design, its own customization method, and its own per-piece price. A hoodie decorated front and back is two designs, even when the artwork matches. Build each side in the Design Studio, and both land in the same order.
Is there a minimum to order a custom hoodie?
No. Order as low as 1 hoodie at Griwolfe with any customization method: embroidery, a patch, or printing. A single unit costs more per piece than a volume run, and patch setup makes 1-unit patch orders the priciest per piece.
What if my logo file is blurry or the wrong format?
Upload PNG or JPEG files in the Design Studio; email anything else, such as an AI or SVG file, to custom@griwolfe.com. Not sure the file is sharp enough? Upload it anyway, add a note on that side of the hoodie, and check the proof we email before production.
Can I design a zip-up hoodie the same way?
Yes. Full-zip hoodies list their own sides and spots and take the same customization methods. The zipper runs through the front, so the chest and the back are the usual homes for a logo. Shop custom full-zip hoodies to open one and see its options.
Start Your Hoodie Design
At Griwolfe, you build the design once, on the garment itself. Every choice gets confirmed twice: on the live preview while you work, and on the emailed proof before production. Pick the side, set the method, and build. If your first order is one hoodie to check the look in person, that's a real order here. Design your own hoodie when you're ready.
Share:
Golf Tournament Gifts: What to Give at Every Prize Tier
Vintage Rope Hats: Corduroy, Earth Tones, and Which to Order